Friday 29 June 2018

Nordic Christmas Collection

Good afternoon everyone , welcome to my blog,  today i am sharing with you Tonic Studios brand new launch with the Nordic Christmas collection ,launched this morning at 10am on Hochanda.
Materials used:-
Nordic Cone die set
Red chilli craft perfect 
Avocado  Green craft perfect
Bright White craft perfect
Harvest Gold mirror Craft perfect
Kraft card  craft perfect
Snowflake fro the Xmas buildables die set
The bunting is so easy to put together you are just using The layering dies in this set with ribbon threaded across the back with a back panel covering the back so you don't see the ribbon,the base of the bunting for this project I drew around the largest plain die and cut out with scissors so to give me an extra layer.

Materials used :- Nordic Tag set
Craft perfect Kraft card
Craft perfect Ivory
Craft perfect Chilli red
 Craft perfect Gold mirror
Craft perfect Twines
Basic square layering die sets

Materials used as above
The tag box is so easy to put together you need to die cut 4 of the tag sleeve and add red liner tape or wet glue to all the glue tabs and then die cut a square from your basic layering square die sets place one on the bottom and one on the inside to make a firm bottom to the box. Then decorate each side by die cutting the detail in red chilli card stock and gold mirror card and then cut the backing in Kraft card, when sticking the red and gold layers together slightly off set to create a shadow.
 Then it's just making up as many tags as you wish to put in the box here I have added 10 tags all in the same colour family I know these would be a great gift to someone  and well received but don't just think Xmas  this box with favours added with decorative papers would be beautiful at a wedding or table decorations.

Materials used :-
Craft perfect  Pearlescent Red velvet
Craft perfect Speciality card golden satin
Craft perfect Golden Mosaic embossed card
Nuvo -Handmade Poinsettias 
Red satin bow

Thank you for visiting me blog today
Will be back to share more with you over the weekend xx

Thursday 28 June 2018

Nordic Christmas Album

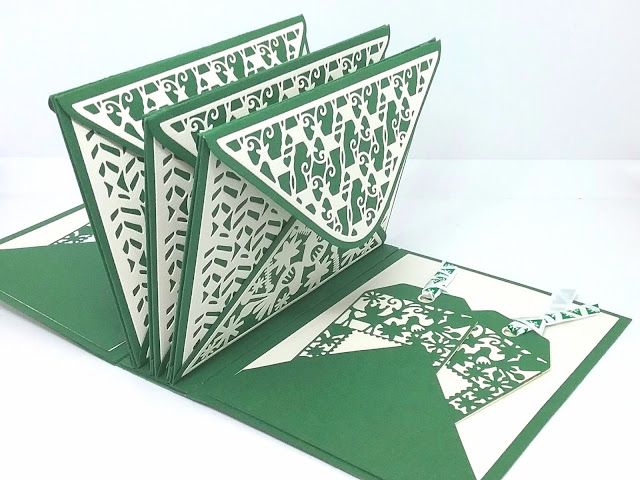
Good evening everyone, wow !! Your all in for a treat tomorrow Tonic Studios Launch the Christmas Nordic collection on Hochanda at 10am these dies are fantastic try and think outside the box a little bit with them and you will see you can make alsorts from wedding boxes to tag boxes tag books, albums birthday books ,bunting the list goes on and on . I was lucky enough to have a really good play with this launch I have lots to share with you over the weekend. Any questions just add them in the comments and I will get back to you as soon as I can. Right I set a bit of time to one side for this project I will say it took some card and a lot of die cutting but it was so worth it. I used the Envelope from the die set and created  an envelope album I thought this would make a beautiful gift in each envelope there is a Xmas card if you put a slightly smaller card inside you could include the envelopes. I know in the past I have made gifts similar but not as nice as this and they have been very well received. So here we go.

Materials needed :-
Merry Christmas sentiment from 2017
Nordic Christmas die sets Envelope and gift tag
Memory albums pine creator
Craft perfect Avocado Green card Stock
ivory Craft perfect Card Stock
Harvest gold Mirror card craft perfect
Ribbon
Die cutting Machine Nuvo craft deluxe Adhesive
Nuvo red liner tape
Scissors
Guillotine
Scoreboard


First you will need to make a spine this is created using the memory book 2 spine die, measure the envelope from the Nordic collection and work out what length spine you need just like you would when making a memory book.then decide how many envelopes you wish to put inside,this album has 6 envelopes placed inside so you only need to die cut the hinge die once make sure once you have folded the hinge back and forth you place it on another piece of card to add some strength to the album.

When you have die cut and made all your envelopes up you will need to add a strip of red liner tape to the bottom of each envelope and place wet adhesive to the upper part of the envelope and sick one envelope to one side of the hinge and the other to the other side of the hinge sticking 2x envelopes back to back.

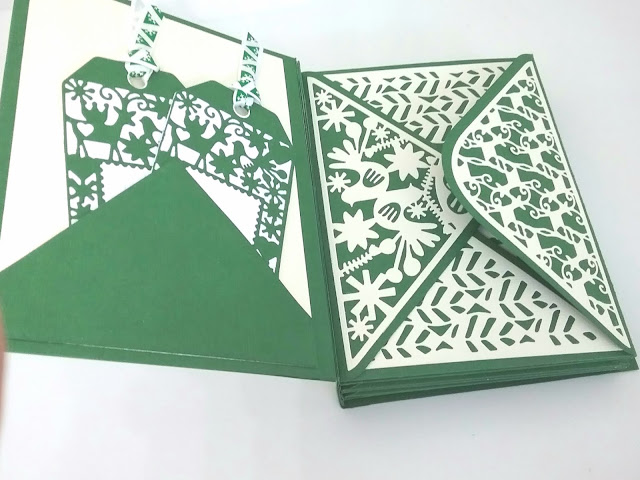
To make the card to slide in and out I doubled over the card stock and just edged the die over the  spine so your only cutting 3 sides and then cut the detail part and place on top of the card blank. The inside pockets to hold the tag are from the flap of the envelope just adding red liner tape to the sides and bottom it makes a lovely pocket for the tags.

4 tags were made for  this envelope album 2x in the front pocket and 2x in the back pocket
The album cover is made just as you would make a cover for your albums and there are lots of videos on jodies group now. cover the inside of the album front and back to add strength to the album.


Thank you for visiting my blog , I hope you will click the follow button on the right side of my blog you will then receive a notification every time I blog something for Tonic.
Enjoy the shows and have a great weekend everyone xx


Tuesday 26 June 2018

Bookmark & Tag collectoin

Good morning everyone,here to share with you Tonic Studios Bookmark die set with two tags,these were only launched on Sat on Hochanda with Paula ,I have three projects to share with you today using these die sets.
Materials used:-
Bookmark & tag set
 Square Kaleidoscope  die set
Bright White - craft perfect
Kraft card- Craft perfect
Teal - craft perfect
The bookmark dies fit perfectly onto this kaleidoscope  box so giving you yet another decorative panel to your sets and I just love these colours together,the box was then finished off by adding the gift tag from the die sets. 

Materials used :-
Bookmark& tag  die set 
Bowscale die set
Memory books die set - for sentiment
For you sentiment
Chocolate craft perfect
Pistachio green craft perfect
White base card 300gsm
Ivory seashell pearl drops
Gingham ribbon

To create this card you will need to cut a frame with the bowscale die set this will be placed over the the decorative panel on foam pads to add some dimension to your card. The decorative panel is made die cutting the decorative bookmark died and cutting into your card stock just lining up the die with a very slight gap between each section this is then glued down to the pistachio green layer and glued flat to the card base then the frame added on top.
The tag was was die cut in matching colours and a decorative double bow was added in gingham ribbon and finished by adding a sentiment- for you placed onto a frame from the memory book 1 die set again using co-ordinating  card stock and adding ivory seashell nuvo drops to the corner of the frame.


Materials used:-
Bookmark & tag die set
Sweet nothing tag set - Sent with love
Good luck sentiment
Nuvo drops
Tassel
Tonic Studios large tag die sets
Decorative papers
Decorative tassel

The card was made using 2 of the largest tag die sets and placing a score line in the back of one of the tags then covering with decorative papers and inking around the edge with Nuvo brown  hybrid ink using a Tonic blending sponge.
A pocket was created for the front using the outer die from the sweet nothing - Sent with love die set.
And the placing this to the front of the card with wet glue  the bookmark was  die cut with the back panel in Kraft card-  decorative papers and Ivory craft perfect all glued flat then a decorative tassel was added punching a whole in the top of the tag and threaded through. The front of the bookmark holder is decorated with one of the tags from the same die set and finished with Nuvo drops in tow colours and using a pokey tool drag your tool through your drops just leaves a lovely decoration. 


Thank you for joining me today  , if you would like to follow me if you scroll down the right handside of my blog and click follow you will be notified every time I post a new collection from Tonic Studios

Pretty handbags

Good morning everyone , well I was going through all my photos and launches coming up and a couple of the new bags from Tonic Studios slipped past me so here they are.
Materials used :-
Blue bell Trellis bag die set
Navy craft- perfect card stock
Ivory craft -perfect card stock
Gold mirror -Craft perfect
Kraft card- craft perfect
Everything on this bag is from the die set nothing extra has been added and thats what i love about these die sets if your staring out with your journey with Tonic & die cutting you have everything you need in this set to make a stunning gift bag. 
Materials used :-
Lattice Lily Pillow box bag
Chocolate craft perfect
Decorative papers 
Vellum
Craft perfect- Ivory
Craft perfect- Gold mirror card


To create just a plain pillow bag you will need to trim off the handles but keep both the glue table at the bottom of both die cuts these will hold your pillow box together just to give you more choice. For this pillow box I went with patterned papers and a vellum wrap.

Materials needed :-
Lattice Lily pillow box die set 
Cream card stock 240gsm
Patterned papers
Pink -craft perfect 
 This is with the handle in place as a full pillow box,you will need to trim off one of the glue tabs at the bottom , the glue tab at the bottom and the top half of the bag have been glued together with wet glue left to dry and decorated flat as it's much easier and then once dry you can flip in the side pieces making sure the decorated edge is to the outside of the bag, the bow was then put in place using a hot glue gun.


Thank you for taking the time to visit my blog today
Until next time xx

Friday 22 June 2018

Bags bags and more bags

Good morning everyone, well who is loving the beautiful dimensional bags from Tonic Studios then ? Well they were great fun to make and decorate really all the hard work has been done for you with the construction ,these die set which  are 3 sets in the collection are jam packed full of dies.
Today I will share three bags with you.
Materials used:-
Blue bell Trellis Handbag
Ivory craft perfect card stock
Chapagne  craft perfect card stock

This bag can be decorated really funky and fun or so very elegant ,but how lovely to receive such a beautiful bag with a gift inside where on the high street could you buy such a beautiful gift bag like this , they don't take ages to make either so batch making for a wedding or party wouldn't take to long. 


Materials used:-
Lattice Lily Pillow Bag
Bright White craft perfect card stock
Nuvo drops - ivory seashell
Pale blue card stock from my stash
White satin bow
I think this would be a beautiful gift for a new arrival with baby booties  or hat inside and what a beautiful presentented gift it would be and a keepsake ,equally these bags would be beautiful for a wedding or christening or party boxes cut the handles off and you have a traditional pillow box ,it's really up to you to decide but it's a really good size pillow box.


Materials used :-
Peony Bloom   Handbag
Chilli red Craft perfect card stock
Craft perfect Kraft card
Craft perfect Bright White card stock
Decorative papers from a 12x12 pad
Red satin bow
 I am thinking if you made these bags up for a hen party for all the girls going out you could put beauty products inside  or silly things ,fun things so many different occasions these bags could be used for.


Thank you for visiting my blog today, will try and share more with you later today, if you would like to be notified when I have blogged please click the follow button on the right hand side of my blog ,if your unsure of anything you can always leave a message in the comments and I will get back to you as soon as I can.
Have a great day everyone xx


Thursday 21 June 2018

Funky Handbag

Good afternoon everyone, well we have a brand new Launch from Tonic Studios launching the fabulous New Dimensional bags on Hochanda this evening at 6pm  and 8pm with Jodie.These bags are stunning and so easy to put together you will have great fun with these and you can fit a good amount inside these bags.
Today's bag i am sharing with you i decided to have some fun the moment i received this die set i saw a pair of glasses which is actually the 3D bow but once it popped into my head i just had to go with it.
Materials used :
Peony Bloom Handbag
Craft perfect Black gloss mirror
Craft perfect Silver Mirror
Black Nuvo drops
Decorative papers and pink tone card from paper mill 
Wills Hand enjoy sentiment
Black satin  bow

These bags are so easy to put together all the work is done for you it's just up to you how you would like to decorate them which is the fun part.


Thank you for visiting my blog today 

Will share more samples with you tomorrow


Tuesday 12 June 2018

Memory albums 2 Christmas Themed

Good morning everyone, just popping by to share the Memory Book 2 collection with you from Tonic Studios,also at the bottom of this blog post you will find a step by step slide show of me talking my way  through a basic album ,you  certainly  love these albums and being a newbie to albums myself I am  getting a bit addicted.
The first album I would like to share with you  is Christmas themed I know Christmas, but thinking ahead what a fantastic way of keeping those treasured memories past or present for gifts or yourself to pass down through the family. I think it's so important to put photos in albums with as much journaling as you can ,my husband and I have many photos  in our loft and nobody to ask who these picture's  are as there are no dates or names on the back of the photos and all my husband's side have passed away so i think this is so important.


All the album is decorated with craft perfect card stock apart from the red base card which is fill a box and is 3oogsm so you can imagine this album is really sturdy as it's 600gsm when All the pieces are stuck together.
The decoration was snow flakes from Tonic Studios and the decorative papers are from every crafts a pound 6x6 paper pads.
This album has the two pages stuck back to back leaving a side pocket to add an extra page for a photo and journaling. 

Magnets for the album flaps are 10mm x 1mm and lots available from amazon & ebay.

Thank you for visiting my blog today Be sure to click the follow button if you would like to see more of my makes


Below is a basic album slide show of putting one together,I hope this helps if you get stuck just leave a comment or message me on FB no problem.


Until next time 


Alluring Perfume Bottle gift boxes