Friday 26 January 2018

On your special day

Good morning everyone and welcome to my blog, this morning I have a card  to share with you from the dot & drops launch a beautiful set of dies that work along side all the fabulous Crystal drops but they look fabulous cut and embossed or even stitched with fine thread ,seabeads it's really up to you.

Materials used :-
craft perfect Bright white
Craft perfect black
Craft perfect  Raspberry  pink
On your special day die and embossing sets
Dots & drops - Arching Swirls
Black Crystal drops
Small spiral flower from the Kaleidoscope box set

The card is 8x8  with a base layer cut in black craft perfect card stock then the die sets we haven't had come with a border sentiment and embossing folder were used for this card and one side is embossed and a matching ribbon wrapped around and then stick on to the pink layer behind then placed on to the card blank.
 Now you cut into the white layer to go on the opposite corner with the beautiful flourish  arching swirls  dots and drops die, this is then stuck to the pink layer and added to the card now if your not confident  with the black Crystal drops try putting some black drops on a none sticky carrier sheet and leave to dry over night and then glue these to your card or dot every other dot leave to dry and then go and fill in the remaining drops it's really up to you.
Then adding the sentiment strip down the centre and  finished the card off with a small black spiral flower , a very clean line fresh card  that can be used for any occasion.

Thank you for visiting my blog today I am sure I have plenty to share and catch up on over the weekend so keep an eye out for me posting again until then have a great weekend everyone xx


Tuesday 23 January 2018

Dressables Collection

Good morning everyone, wow time is escaping me it's been a busy time recently lots of fabulous things coming from Tonic Studios my lips are sealed for the moment but just catching up so bear with me , I have a few samples from the Dressables to share with you and boy they really did fly out the window several times so with that in mind why not share my super hero with you and some of her friends.
 Super hero isn't she so fab , so many ways of creating these characters to be male or female. There are 3 sets in the collection 1 set being the body parts and then set 2 and 3 are female and male so you have their outfits and hair ect. 
This card is a DL and using the star from our basic layering sets  and the wow from or Alphabet die sets it's a perfect  to add to cards like this or even the speech bubble from the buildables would be great to add to these cards .


What little magician in your house or big magician in your house would not like a card like this ,so much fun. The card is 8x8 and basic layering circles were used for a mount for the character then his magicians hat was used to go around the circle to then display its a magic show .


The Ballerina  is such a cutie pie with her little hair in bunches the dies in the sets are so versatile you can create lots of different hair styles and change their expression on their faces by moving the lips at a different angle.
This ballerina was mounted onto the Victorian layering die set and the background was stamped using the Ballarenas shoe stamp that comes with the complete kit. She was then made up and chalk was used to give her colour to her face and then the tutu was cut 4 times and a very fine layer of foam tape was put between each layer to give different layers so she's more 3D.

This chap is awesome  Howdy Partner, again these stamps come in the complete set and you get everything  to build this little sheriff from his gun to his chaps and that Stetson is fabulous , remember to ink through the dies to add definition it really brings the characters to life.
This card is an 8x8 with mat and layering and wood effect papers used from my crafty stash and then the basic layering ovals and stars were used.

Well this princess fairy is just adorable she has her Tiara  and wand with a beautiful dress you can add the wings or not the choice is really up to you,decorated using the beautiful DL decorative dies and the beautiful flowers from Tonic Studios kit 5 if you were lucky enough to get hold of that kit.

Luv this character ,Happy Birthday Matey ! ,what little boy wouldn't want something like this hanging in his  bedroom, the ring is MDF from the wreath collection and it was distressed  with vintage photo from Tim Holtz and then I added a mix of Nuvo mousse until I was happy with the look I was going for I was thinking port hole when I made this,I also punched the ring with a crocodile and added decorative bratds and then wrapped the ring with decorative Nuvo twine stamped the greeting onto a Tonic Banner die and then found some decorative ribbon  added a scull and crossbones to the knot and then added the pirate but you could easily fit more pirates onto the ring if you wanted to.
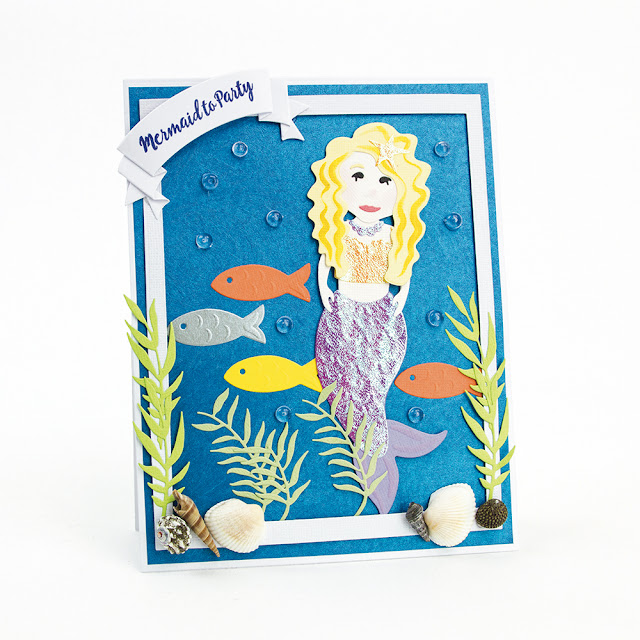
She's such a cute character mermaid party was stamped onto a Tonic Banner die with the blue Nuvo hybrid ink pad and then the mermaid was mounted onto a card made using Tonic Studios English Picnic die sets the fish are all cut from Tonic Studios Craft perfect card stock and are from the Pets Rococo dies sets and then to embellish further I used from leafy collage from kit 5 and then added some shells from my stash & also some clear beads to look like water bubbles.

Man of the match, luv this Character as you have the choice for him to be in any team colours you wish, the card is 7x7 and the Rosette die set was used and the tonic screens  to make the goal post netting and then the tufts of grass are from the male Rococo die set  .

And the last card to share with you is the Dr and I also made a nurse in scrubs from the same set see how you can mix and match they are so versatile  could be a love DR for Valentine's to  a get well or just thinking of you the choice is up to you. Thank you for visiting my blog today and my apologies for a flying visit back to the prep room for me,keep an eye on my blog later today as Tonic have a brand new launch dot & drop tonight at 6pm on Hochanda and I have lots to share with you xx


Monday 22 January 2018

Kit 6 Butterflies

Good morning and welcome to my blog, today I would like to share two cards made with the fabulous Tonic Studios Craft kit 6 which features a fantastic butterfly easel die,stamps and a beautiful collection of papers ,not only that there are the brand new Nuvo foam pads and beautiful co ordinating peacock glitters in such cute glass jars all colours co -ordinate,  so all the hard work of mixing and matching is done for you,the hardest thing is to choose which colours you would like to create with.
As you can see the kit is packed full of gorgeous goodies the glitter markers are just fantastic if you have a water brush add a little pen to a glass mat and pick up the colour with your water brush it gives a beautiful effect to your projects. I will add the link to the kit below if you would like to purchase this fabulous kit 6.
Www.toniccraftkit.co.uk
Well I had great fun making this card the die does all the hard work for you no measuring or guessing where to place the score lines it's all done for you ,such a clever design .With this card I used the contents of the kit and added  white base card stock and a piece of construction accitate i must say Tonic Studios construction acetate is really fabulous a good weight just remeber to remove the protective film before you use.

As you can see the die was cut in the base card stock which is white  300gsm, then the butterfly has an outer edge so back to the verso edge which we all love .The base of the butterfly is using the gorgeous speciality paper with a pattern running through again this paper is in the kit then the top part of the card the base layer is cut from the darkest colour  and then the detail in white this is all glued together using the deluxe adhesive from Tonic.
Now you need to cut a detailed layer in white again then adding glue to the back of the butterfly place down onto a piece of acetate leave to dry for a few mins and then free hand cut around the butterfly with scissors. Now flip the butterfly over so you are looking as the back and add a little deluxe glue to the areas you want to add glitter this will look milky but don't worry it will all dry clear after a while so each section pick a different colour glitter until finished and place to one side for an hour at least ,then once dry shape your wings a little over something like a rolling pin and then place a little hot glue to the back and overlay it to your base butterfly .Now it  looks like it's ready to take flight.
For the stopper I added a sentiment to one side and then die cut one of the smaller butterflies then stamped and coloured with the glitter markers using a water colour brush then added foam pads to add a bit of height to form the stopper.

For this card I used an 8x8 card blank and the Victorian layering die set for a mount but everything else is from the kit.
The stunning papers are just a dream to work with the texture just comes through making  your cards look expensive.
The base of the card is mat and layers with the mount being from the Victorian layering set the butterfly is cut in bright  white craft perfect  card stock and then the detail cut in the papers from the kit glued flat with deluxe adhesive, my favourite adhesive as it has a slight wriggle but then it's stuck which is great when making a batch of handmade flowers your not sat holding them until they are dry,
Now you need to add a glue pen to each section you want to add glitter until you are happy with your choice then shape the butterfly slightly and add glue to the centre  and place onto your card.
Now add the glitter and Crystal drops to the butterfly and a few trailing behind and to finish add a sentiment  like the one shown.could be for any occasion .


Thank you for joining me today

Be sure to pop back soon as Tonic have a brand new launch on Tuesday which is gorgeous xx


Friday 19 January 2018

Dressables Mr & Mrs

Good morning everyone, well Tonic Studios have a very exciting launch today with the Dressables they as so much fun to create fabulous cards projects and the kids would have a fabulous time playing with these sets.
There are 3 sets the first set builds the character and the second set is girls and the third set boys where you can dress them up as different characters  there is also a stamp set that stamps different sayings super hero ,princess ect. Join Jodie on Hochanda again today at 3pm & 7pm.
To create this card you will need :-
Bow easel creator die set
Dressables die sets
Mr & Mrs die set
Banner die set
White base card stock 
French Blue craft perfect
Cornflower blue craft perfect
Polished Gold Craft perfect
Chilli Red craft perfect 
Bright White craft perfect 
Black craft perfect 
Kraft card craft perfect
Gold silk speciality craft perfect

The base card was constructed in white 300gsm card stock and the detailed panels were made up using French blue and cornflower  blue craft perfect card stock the bow that comes with the easel  die set was made up in matching colours and used as the stopper for the card. A king and queen  very grand ,A card that you could send to any couple for an anniversary  card engagement card or wedding card or just fun cards for the children it really is up to you. The dressables are so easy to create, the dies do all the card work you cut the body and head out and then basically cut what outfit you like. Top tip get creative by adding inks through the dies to give extra colour to the detail in the hair and add some colour to there faces using pens or chalk or water colour pencils.

Thank you for joining me today be sure to tune in to Hochanda  today at 3pm and 7pm but if you really need these die sets please don't hang about as 70% of the stock sold out on the first show today so could possibly sell out at 3pm


Until next time xx


Thursday 11 January 2018

Beautiful Jigsaws

Good afternoon everyone, well as many of you know Tonic Studios Jigsaw Die & stamps sold out in record breaking time so I have more cards and a wall hanging I made for the shows to share with you all so I will go ahead and post them all below.
This is an 8"x8" card blank the base layer from the jigsaw was die cut from black craft perfect card stock then the next layer  that cuts all the base layer pieces  in craft perfect polished gold mirror card.  It was a case of mixing and matching the decorative pieces in the  jet black ,bright white and Chilli  Red craft perfect adding the stamps  love & laughter I think this would be lovely in a frame to give to your loved one on Valentine's, the panels were then stuck down some flat and some with foam pads to create different levels to add dimension. You could even add a photo of you and a loved one together in the largest jigsaw piece the list is endless of what you can create with these sets ,definitely lots of home decor pieces.

This is a wall hanging I couldn't get my hands on the right size canvas so I cut a couple of the 8x8 squares from the Greek Temple die set and glued them back to back to make a solid board using 2x sheets of 300gsm card stock in ivory then cutting a layer in the beautiful  majestic gold pearlecent  craft perfect card the base layer from the jigsaw set was  Espresso brown craft perfect and then cream craft perfect the 4 corner pieces were distressed with gold nuvo mousse and the tea and coffee stamps were stamped with a  clear  ink pad and white nuvo embossing powder , thinking along the lines of tea and coffee my mind shot back a few yrs to the die sets we had with the teacup and teapot/ coffee pot I luv to bring the older dies back as I know many of you have them in your stash and one thing tonic are good at is designing new dies that work really well on there own but also with your older tonic dies.
The back of the wall handing I used the hangers from the Shadow box die set and then threaded a rich brown satin ribbon and wmatching bow with a decorative button and bakers twine.

My idea behind this card was the queen of hearts I was thinking hearts, jigsaw and playing cards and that's where the colours came from I just wanted a very plain modern look for this one the gorgeous black glossy craft perfect was pardon the pun perfect for this card a lot of paper piecing but I definitely think it was worth it what more could you ask for family and friends ,the heart was cut out of a white 7x7 card blank using the latest affection die sets Tonic launched a few weeks ago.

And finally a 7x7 twisted   easel card using the colours for white wine and chocolate now who wouldn't say no to either one .I decided for this card just to take 5x jigsaw pieces from the set and make a smaller card using one of the jigsaw pieces as the stopper for the easel ,I also added the wine glasses from the Rococo celebration die sets ,all you need is wine and Chocolate sounds perfect to me. The card stock was  Champagne craft perfect and also ivory and chocolate brown craft perfect also the stamps were stamped using the brown nuvo hybrid inks.


Well that's all from me for the time being thank you for popping over to my blog today and I hope to be sharing some new things with you all soon.xxx

Tuesday 9 January 2018

Alphabet Puzzle

Good afternoon everyone ,Sharing a little project I created for tonight's Jigsaw Launch from Tonic Studios launching at 6pm on Hochanda,A show not to be missed as the team have made amazing samples.
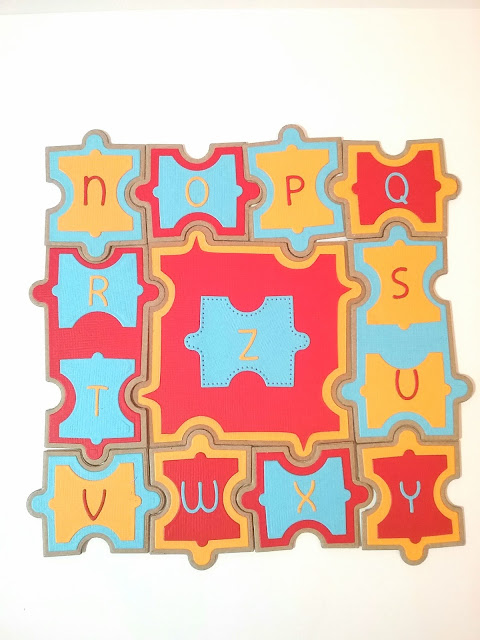
The minute I saw these Jigsaw dies it screamed out to me a child's puzzle so I decided  learning the alphabet puzzle would be a good idea.
To create these Jigsaw pieces cut the base layer  Twice and stick back to back using Tonic Studios Deluxe adhesive it then has the feel of a chunky chipboard and great for the children to hold or older children to hold with learning difficulties  this was my idea behind this puzzle it could just a easily be numbers or anything you like .


The box is 2x pieces of card measuring 6x6 and scoring 1" all the way around making sure the lid is slightly bigger  the lid will need to be die cut in the centre using the larger jigsaw piece to make the window and then add Tonic Studios construction accitate using red liner tape then to decorate the box you will need to add a small jigsaw piece to the front of the box using craft perfect card stock in red & yellow & cornflower blue the sentiment is from the Kaleidoscope  box set.
The side of the box has been decorated in the plain jigsaw layer and trimmed of to make it neat the box is also lined inside to leave a nice finish and also gives strength to the box.
This side is A to M starting with the large centre and working around the outside then you break the bits up turn them over and the other side is  N to Z .
The Alphabet sets from Tonic are a perfect fit for these jigsaw pieces


Hope you enjoyed the puzzle

Until next time xx


Alluring Perfume Bottle gift boxes