Tuesday 29 November 2016

For you

Good afternoon everyone, welcome to my blog today.I am sharing a card with you from Tonic Studios brand new launch the Mandala moments stamps and die sets these sets are very different and remind me of zentangle so much fun to colour also Tonic have some wonderful New Nuvo Brush tip pens that are ideal for these stamps but so much more , join Hels Sheridan at 4 pm and 6pm today on create and craft for some fabulous demonstrations .
Materials used:-
Swirling Frame Layering die set
Mandala moments  flower stamp & die
Mandala moments For You stamp & die set
Beautiful blooms and Gerbra Daisy


The card base is made from the Swirling frames die set cutting 2 panels out the same size and putting a score line in  the back of the card base sticking together with red liner tape so it has a strong hold. The For you Stamp was coloured with a fine tip pen in shades of blues and then i drew around the die with a pencil and cut out with scissors so i had a coloured base to place the coloured stamp, this was then glued with 3d foam pads to add depth to the card.
I then stamped the Mandala  flower stamp 4 times and coloured with pens then with scissors i cut in a straight line to the centre of each flower and then curved each edge in to form a cone shape and glued with funky glue you need to hold this just a min until its grabbed i did this with all 4 flowers then with a pokey tool i curved the edge of the petal shapes over and glued one inside the other to create a 3D rose and finished by adding some leaves from the beautiful blooms Gerbra & Daisy set and some nuvo drops.


Thank you for popping by today , hope to see you again soon.


Victoria xx

Monday 28 November 2016

Fluttering Butterflies

Good morning, well the sun is out what a beautiful morning, busy day here prepping , but thought I would pop along and share a card from Tonic Studios Idyllic Die and Embossing Sets.
Idyllic -Fluttered Fence
Wish you well sentiment


The card is 7"x 7"  , for this card the embossing I used a beautiful shade of pearl card stock which embossed beautifully  in these folders giving you a luxurious finish to your card and adds that touch of elegance.
I then cut the detail part of the die with plain white card stock ,you then need to emboss with the card still in the die ,then leaving the card stock in the die I used spun sugar distress ink with a piece of cut and dry foam and inked through the die and used it like a stencil this added the hint of pink to the detail of the Butterfly this is a good way to add detail but still keeping the card flat for posting if postage is a concern.
I then added a double bow and finished with a beautiful sentiment I wish you well ,and I'm sure who ever recieved a card like this when there under the weather would definitely brighten up there day.


Thank you for taking the time to visit my blog today


Victoria xx 

Friday 25 November 2016

Love

Good afternoon & welcome to my blog, Today I am sharing a brand new launch from Tonic Studios launched this morning on create and craft, the beautiful Idyllic range which is an Embossing folder 6"x6" an overlay Die with a separate cutting edge so these sets have so many possibilities  so you can use the die without the folder or use the folder without the die or both together the choice and style is completely up to you and there so elegant when made up I think anyone who receives one of these cards will recieve a very special card.

Materials used :-
Idyllic die & embossing folder Set -Filigree  Affections
Love Sentiment
Basic Square Layering Die Sets


This shows that it's a card and gift card in two just something a little different,the thing to remember is yes you can make the cards as intended with the design but  don't  forget to snip here and there for different ideas, think outside the box a little and you will be amazed at what you can achieve.


Thank you for taking the time to visit my blog today

Hope to see you again soon


Victoria xx

Monday 21 November 2016

Posey Pillars

Good afternoon and welcome to my blog, well it's definitely a Crafting day here in Cheshire it's absolutely pouring it down  and so dark outside so stew cooking slowly, heating on and I'm in the craft room sounds a perfect day to me.
                                                              Hope you all managed to catch the shows with Jodie over the weekend as Tonic launched the Fanciful Flocals die sets such a pretty delicate collected with very fine detail.
Dies used :-
Fanciful Florals Die collection - Posey Pillars
Basic layering die set - Sunray Venus
Chalkboard die set- It's your big day


The card is 7"x7" with the front panel scored in half  again and folded back on it's self .
The Posey Pillars were cut out in white essentials card stock and then cut again in pink essentials card stock and clued together using funky glue which is a wet PVA clue and is very strong the only glue I use and my Tonic hot glue gun, The funky glue gives you a little wriggle time before its stuck completely  you  want to glue these 2 strips slightly off set to create depth and dimension and adds a little shadow.  I cut the basic layering dies Sunray Venus out in white essentials card stock and then a pink layer of essentials and added the pink layer with 3D foam pads and  added the sentiment which is cut with silver foil card and white card stock this is glued flat with funky glue, to finish the card I added the same basic layering dies to the inside for somewhere to write and added white Nuvo drops just to add a finishing touch to a very simple card.


Thank you very much for joining me today and welcome to any new crafter that have stumbled across my blog ,it's always lovely meeting new crafters, if you have any questions just pop a comment in and I will get back to you as soon as I can.


Until next time 


Victoria xx

Friday 18 November 2016

Say it with Florals

Good afternoon everyone, we have a brand new launch tomorrow morning -sat 19th Nov on create and craft at 9am with Jodie, launching the Fanciful Florals from Tonic Studios.
                              Today's card is from the very pretty  Large Heart Die Set these die sets have very fine detail almost like lace but they cut and emboss beautifully but that is what we expect from our dies from Tonic.
Dies used:-
Fanciful Florals- Large Heart Die Set
Fanciful Florals - Dual Hearts 
Square Pinhole layering Die Sets
Venetian Lace large layering Die Set
 with love sentiment - Celtic Dream
Square layering die sets


The card is 8"x8"  with mat and layering then you need to cut the pinhole square die in a deep pink card stock and then thread a length of  narrow white organza ribbon through the holes this is mounted on the card with 3D foam pads, the next white layer is from the Venetian Lace die set and again placed with 3D foam pads, the next layer in pink is from the square layering die sets and then the beautiful Large Heart Corner was cut out in silver mirri and then white card stock, glued flat, slightly off set the  layers to create a shadow and then glued this flat to the card I then inserted some of the silver  mirri  card stock back into the centre of the heart and  then added some smaller hearts to the centre.
 I then added the with love sentiment from the celtic dream die set and finished with a silver organza Bow and added another small heart from the Dual Hearts Die Set.

Thank you for taking the time to visit my Blog Today, be sure to pop back when you can as I have lot's more to share with you from this collection.
Don'the forget create and craft 9am with Jodie tomorrow - Sat 19th Nov.

Have a great weekend everyone


Victoria xx

Tuesday 15 November 2016

A Tonic Collection

Good afternoon everyone,I have a collection of cards to share with you from the Large Number Die Sets & also the Children's Rococo Die Sets from Tonic Studios all available from Create and Craft, join jodie today at 7pm on create and craft for lots of inspiration and demonstrations.


Until next time


Victoria xx

Monday 14 November 2016

13 Today

Good morning everyone, well it's dark wet and rather dull in Cheshire this morning,definitely a Crafting sort of day in the warm but sadly chores to do today but I will definitely be in my craft room late afternoon.
                                                        On Friday Tonic released a brand new launch of the Children's Rococo & also the Large Number Die sets which I have to say are great fun to create with and also great to get the children crafting making cards for there friends and scrapbooks aswell. so this morning I would like to share 4 cards with you from these collections of die sets available from Create and craft.

                                                          13 Today


Materials used :- 
Large Number Die Set -1 & 3
Children's Rococo - Canvas Sneaker
Basic Layering Squares
Stripes  8x8 Embossing folder


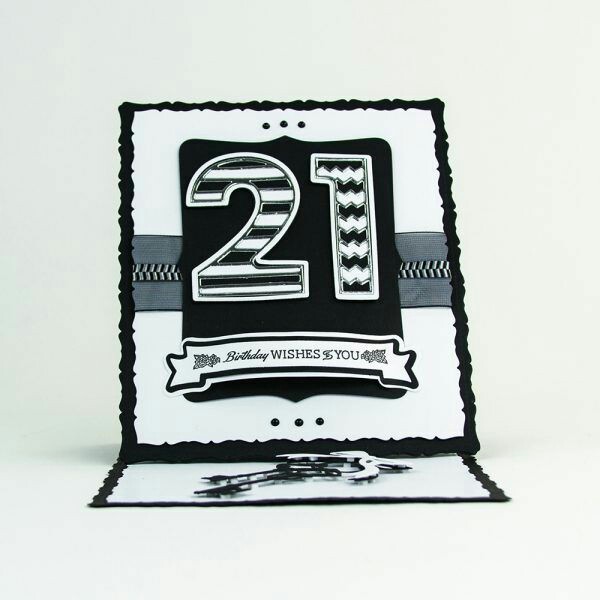
21 Today

Materials used :-
Large number die set 1&2
Birthday banner stamp & Die set
 Rococo Key die set
Large layering Die Set - Harrop
Pattern panels - Quaterfoil


Kingdom Castle 3 Today

Materials used :-
Large Number die sets 3
 Rococo -Kingdom castle
 Basic layering Scalloped circles
Basic layering circles


Toy Robot 6 Today

Materials used:-
 Childrens Rococo -Toy Robot Die Set
Large Number 6 die set
DuoCap Initials - Clarice Alphabet
Basic layering Star laying Die Set


Thank you for visiting my blog today, be sure to pop back tomorrow when I have a full blog post to share with you with more card samples from these die sets. 


Until next time 


Victoria xx

Friday 11 November 2016

Fairytale Castle

Good morning everyone, Today on create and craft we see a brand new launch from Tonic Studios with jodie at 12 noon, The launch is the fabulous Children's Rococo die sets & also Large Numbers Dies which are fabulous together or used on there own
Dies used:- 
Large Number- 3  Die Set
Childrenns  Rococo -Fairytale Castle Die
Scalloped circlear layering Die set
Circle  layering din Set
Scalloped oval layering die set
Oval layering die set


The card is 8x8 with a scalloped edge  with some layering to add depth to the base.
You need to die cut a circle from your layering die sets and then in a smaller size you need to cut a scalloped circle and this was stuck together with 3D foam pads to add depth and dimension to the card, the castle was cut in white card stock then stuck flat with funky glue to some pink card stock and cut out free hand with scissors the very tips of the castle I used a fine tip glue pen and pink nuvo glitter and this was stuck to the circle die cuts with foam pads.
For added interest and to add a splash of colour I cut a large banner shape free hand out of some patterned paper from my crafty stash then I cut  the scalloped oval die in white and an oval die cut in pink again these were stuck to the card with 3D foam pads.  I die  cut the the Number 3 in pink card stock from the outer edge and then cut with the inner die in white card stock and then cut the die in the same pattern paper as the banner so it's all matching with the inner part of the die I then glued the white edge of the 3 to the pink layer then I inserted the pattern paper into the white edge then I added Nuvo drops.
I then printed off the PC the word today and cut that out free hand in the shape of a banner and then finished with a decorative bow. 


Thank you for visiting today ,plenty more to share with you so be sure to pop back soon


Victoria xx

Thursday 10 November 2016

1. Today

Good evening everyone, would you like a peek at the new launch from Tonic Studios, launching tomorrow friday 11th Nov on create and craft, at 12 noon we have the brand new launch of children's Rococo & large numbers, there are fabulous dies for children and would be great for them to create there own projects to send to there friends ect, the large number are great and ideal for any occasion
Dies used:-
Children's Rococo -Tiny Trike
Large numbers-1
Twisting Veranda die set
Rococo Celebration - Bunting


These die sets are such fun to create with, bright bold colours or pastels it's really up to you to decide.
Don't be frightened  to snip bits of your dies up as I have made the trike it was cut out in different colours and I snipped bits off to create the depth adding different colour wheels seat and handle bars,the numbers are fantastic as you have the versatile outer edge to these dies so if you want plain you can have plain if you want an outer edge a different colour that's another look or you can paper  piece as I have done with this card to add extra colour and depth to the card.


Thank you for taking a look at my blog this evening ,be sure to pop back as I have plenty more samples to share with you.
Don't forget 12 noon tomorrow friday 11th on create, and craft with Jodie


Victoria xx

Sunday 6 November 2016

Tonic girls day out

Good afternoon everyone ,well what a time I had on Thursday I went to the NEC at Birmingham  to the craft show to meet up with most of the Tonic DT what a time we had, so many giggles and naughty  craft purchases although I think we were all really  well behaved and didn't go mad, sadly Paula was working on create and craft USA and the lovely Dawny was moving house  and Sian from the Tonic office had other commitments but I'm sure at the next event we will all finally meet each other ,so I thought I would bob a couple of photos for you to see the gang.
From right to left we have  Nicky , Edna , Karen , Mandy , Claire , and myself at the end and 2 cheeky devil's at the back are Mr and Mrs Love from Create and craft

Them we popped by to say Hello to Pam and Chris on the Tonic Workshop stand and we picked up Alison from the Crafty Devil's Stand along the way, jodie was demonstrating on the create and craft stand at the time, sadly Paula was working and Dawny was moving and Sian had other commitments but we made sure Sian was in the photo with her poster at the back lol, but I am sure we will all meet up again for sure , or I might just have to visit Tonic Towers how exciting would that be.


 hugs xx

Thursday 3 November 2016

Bright And Beautiful

Good morning crafters, weloome to my very early blog this morning it's currently 5.30 am ,it's a big day today as I am off to the NEC at Birmingham today so need to be up  and packed ready for a fun filled day as I am meeting my Tonic design team buddies for the first time ,so excited I'm ready to burst and what fun will we get up to,
                                    Today's cards are from the new Essential Strip collection from Tonic Studios that Mandy Taylor has been demonstrating on create and craft, such pretty dies and so versatile as Mandy has shown with her demonstrations not just card making but  things for the home ect ,never be afraid to snip bits up that's what is so much fun if it doesn't work out what have you lost a piece of card.
Dies used :-
Essentials flower strip
Basic Rectangles Layering Die Set
Rococo Bird House

Very simple but fun  card to put together  the card is made using A4 card stock and scoring in half and then the front panel scored in half again and folded back on it self I went very bold and bright with this card and used one of Tonic Studios papers from our paper pads range and picked the colours out of the paper with the red and turquoise . 
The Essentials die strip has a 2 dies to each strip the decorative part and also a shaped cutting edge which allows you to create a beautiful edge to your cards and projects then the decorative part just nests on top of the cut edge to give you a stunning effect but you can use both edges separate from each other aswell very versatile die sets and so easy to use. 
So I started by cutting the shaped edge to the card I then cut the decorative flower out and embossed to add the detail, this die has little petals that flip up to add dimension I would shape those up before applying glue to sick as you don't want these parts stuck flat if your looking for dimension, I then glued this onto the shaped edge we cut previously on to the card blank and then added our Nuvo drops to the centre of each flower.
 the centre of the card was created using our rectangle layering die sets and also using the Rococo Bird House Die set which was cut out in white card stock  and glued flat to the  red card stock and  cut fee hand with scissors then I traced around the outer edge of the die with a pencil and again cut free hand this gave a lovely turquoise  border around the edge and then I cut the house out again and paper pieced with the turquoise  card stock and finished by adding a little bow and again Nuvo drops.

Thank you for joining me today ,be sure to pop back soon as I have more samples to share with you from this collection and maybe a couple of photos of my DT buddies


Victoria xx


Wednesday 2 November 2016

Elegant Flourish

Good morning and welcome to my blog today ,well all very exciting here as I am off to the NEC tomorrow to meet all my DT buddies from Tonic Studios so excited I can not tell you we have so much to chat about and it's going to be a fabulous day so probably won't sleep tonight.
Today I would like to share a card with you from Tonic's latest launch the beautiful Strip Die sets.
Dies used:-
Flourish stip  Die set
Basic Oval layering die set
Rococo wedding car die
Bride and groom sentiment


The card is 8x8 and I just went very basic simple and elegant with this card and I think the flourish strip is just stunning , I know I shouldn't have a favourite but this is my favourite so versatile as Mandy has demonstrated on c&c, chop them up the ideas will just flow.


Anyone coming along to the NEC tomorrow Thursday 3rd come along and say hello to us all it would be great to meet you


Until next time


Victoria xx

Tuesday 1 November 2016

Buttons

Good morning, and welcome to my blog today. We have a brand new launch of the new Tonic Studios strip dies which I have to say I had so much fun creating with.
Today's card is  from the   button & star strip set  .
Materials used:-
Button & Star strip set
Embellishment strip dies
Rococo Baby  balloon die set 
Rococo Adorable Elephant die
Sunray Venus Layering die set


The card is an 8x8 card blank with the front panel scored in half back on its self then the button strip outer edge has been cut down the right hand side of the card base to create a shaped edge  to the card then in yellow essentials card stock I cut the entire strip out and placed it very nr to the edge just with a slight border of white showing ,the left hand side of the card I left straight,  I cut the outer edge on the yellow layer and then cut the whole button strip in white and again left a slight yellow border .The inside of the card has a grey and yellow mat and down each edge I have cut one of the embellishment strips just to add interest inside the card and also added the sunray Venus to the inside with a sentiment added.
The outside was finished by adding the Sunray Venus layering set only sticking one half onto the left hand side of the folded edge of the card and then adding the ever so cute Adorable elephant from Tonic's Rococo range and for a  finishing  touch I also added the Rococo Baby balloons they were cut 3 times to create a shadow and then  again in grey to insert the  letters baby to stand out on the yellow background.


Thank you for visiting my blog today

Until next time


Victoria xx

Alluring Perfume Bottle gift boxes