Thursday 16 February 2017

2 Today

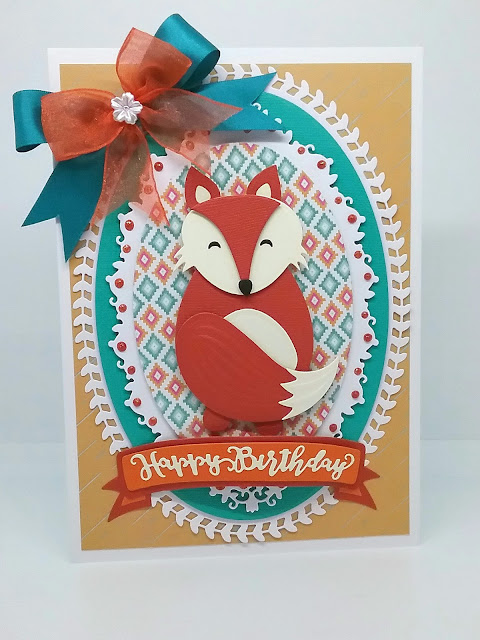
Good afternoon everyone, A card to share with you today that was launched recently for Tonic Studios using the Alphabet die sets and the Hexagons and Octagons,have to say I luv these shapes .
The card is 7"x7" and is an apature card

Materials used :-
Alphabet die set - Attraction simple type  Lower case- 1681E
Alphabet die set - Attraction Simple type - upper case - 1682E
Octagon basic layering die set- 1522E
Marmalade's World stamp set  Henri  & Heffi - 1347E
Marmalade's world Stamp set -Accessory Set - 1353E
Garland Fayre die set- 1266E
Oval basic layering die set - 1456E

The Marmalade world stamps are coloured with the Nuvo Aqua Flow Pens and a water brush.


Thank you for taking a peek today at my blog


Until next time 


Tuesday 14 February 2017

Love is in the air....

Good afternoon everyone,welcome to my blog.
Today I have a card to share with you using the Alphabet dies from Tonic Studios Blockbuster available from create and craft.


This is for anyone that didn't get a valentine card xx


Until next time 


Monday 13 February 2017

50 Today


Good evening,welcome to my blog, Today I am going to share with you a hexagonal box using the Blockbuster from Tonic Studios Hexagonal  and alphabet dies available from create and craft.
Dies used :- Alphabet die sets
Scalloped circles layering basics
Hexagonal  layering die sets
Beautiful Blooms die sets


This is the base
Made from A4 card stock trim the card down to :-
11" 3/4 x 7" 3/4
Score at 1"7/8 , 3 3/4 , 5" 5/8 , 7" 1/2, 9" 3/8 ,11" 1/4
Then rotate so the card is long ways in front of you and score at 2" 1/2
Fold and burnish all the score lines to the  horizontal score line then cut out the small wedge  as you look at this template the bottom left corner this is cut away.
Now you need to cut up each score line up to the short score line mark this will be to fold your base .


This is what it should look like once the small flap is cut off and you have cut up to the score line 5 times across the bottom.
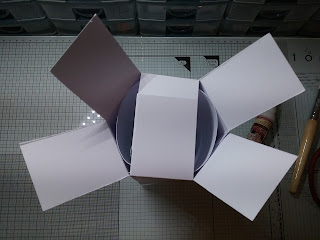
I glue all my boxes with wet glue but it's up to you if you prefer tape,now when you place glue on the tab the box folds over to meet the flap once that is dry I roll a piece of card and place it inside so you have something to work against when your folding the base.

This is with a roll of paper inside it does help when folding the base

Then I fold the opposite flaps on each other and glue

This is the base before you add a hexagonal die cut to cover the workings
Box lid
Card measures:- 
11" 3/4  x  4"
Score long side at 2",  3" 7/8,  5" 3/4,  7"5/8 , 9" 1/2,  11" 3/8
The first panel is slightly bigger than the rest this is to make the lid slightly larger than the base and for it to sit right.
Score on the short side at 2" 1/2. 
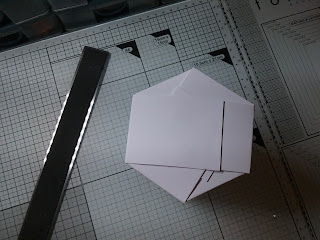
Fold and burnish the score lines like before then cut up each score line along the long side and again cutting off a tab as indicated in the photo.
This is the lid, now as before glue the opposite flaps to get the right shape


Opposite flaps glue on top of each other

This is what the lid should look like when finished

Finished box now to cover all the workings you need to cut the 3rd size down in the Hexagon die set I cut 4 of these out one for the lid top the inside of the lid and also the base and inside the base, this just leaves a very neat finish to the box.


I hope that you can follow my instructions if not leave me a message in the comments and I will answer as best I can but now the fun part in decorating the box.

Have fun everyone 


Thursday 9 February 2017

Football Crazy

Good afternoon Everyone, Today I an sharing a card with you from Tonic Studios New Launch Alphabets and Octagon- Hexagon layering die sets  to be launched this evening on create and craft at 7pm.

Materials used :-
Hexagon- basic layering die sets
Alphabet- die set
Rococo-golf die set- grass
Rococo - Football boot
English Picnic die set
Banner die
Circle - Basic Layering Die set


The football was  created cutting out 6 white Hexagons and 7 black Hexagons an placing them on a green background and sticking flat with  wet glue once dry I placed the circle layering die on top and then cut out.
The card blank is cut front the English Picnic die set and to add decoration I used the rococo football boots and the grass from the rococo golf set such a handy little die the grass  die and i use it often for decoration and then add the finishing touch I cut one of the Alphabet sets out in black and added it to the Banner die.


Thank you for visiting my blog today.


Wednesday 8 February 2017

LOVE

Good afternoon everyone,welcome to my blog .Today we have a sneaky peek for tomorrow's show launching at 7pm on create and craft  with a Blockbuster with the Brand New Alphabet dies and layering hexagons & Octagon die sets.


Material used:-
Greek Temple layering die set
Square basic layering die sets
Topper from my stash
Love- Alphabets 
Topper shape from the octagon layering die sets


Be sure to keep an eye on my blog over the coming days as I have lot's to share with you from these collections.


Saturday 4 February 2017

Woodland Buildables Collection

Good afternoon & welcome,Today I am going to share the Woodland Buildables from Tonic Studios that launched this week on c&c.

Oliver Owl - Woodland Buildables

Betty Bunny - Woodland Buildables


Harry Hedgehog-Woodland Buildables 

Betty Bunny- Woodland Buildables 

Frankie Fox - Woodland Buildables 

Harry Hedgehog-Woodland Buildables 

Betty Bunny -Woodland Buildables 

Frankie Fox- Woodland Buildables 


Thank you for visiting my blog today

Until next time 


Friday 3 February 2017

Congratulations

Good afternoon everyone, well it's that time to share another card with you from Tonic Studios Woodland Buildables collection.

The card was created using:-
Celtic circles large layering die sets
Basic Square layering die sets
Twisting Veranda die set
Congratulations sentiment 
Oliver Owl - Woodland Buildables
Woodland Banner Die set

The card was created using the outer scallop from the Celtic circles die set cutting 2 of the large circles out in black card stock and scoring about 1" down and across  the back panel of the card this will then form your hinge for the card blank stick to the front panel using wet glue or a strong tape like the red double sided tape would be ideal.
Then you need to cut 2 of the detailed panels from the Twisting Vernda in white and over lap them to create the Lattice effect glue these together using a little wet glue.
Oliver owl is cut from craft perfect card stock in shades of grey and Oliver's tummy has been guilded with nuvo mousse just to enhance the embossing. The graduation hat was 2x squares one slightly smiller than the other, with a brad  putting a hole through the centre attaching a black tassle.
The scroll is just a piece of thin card rolled up and fine red ribbon tied off.
You then need to cut the main part of the banner in black and the top layer in white then adding congratulations die in red card stock the banner was then shaped so it was an arched shape and this was glued down its hot glue just at each end just to give the card some dimension.


Thank you for stopping by


Until next time 

Thursday 2 February 2017

Betty Bunny Easter Treat

Hello everyone & welcome to my blog , well who's looking forward to Tonic Studios Woodland Buildables  launching  today ? Join jodie at 8am on create and craft.
 Today is a lengthy post with lots of step by step photos of an easter picnic basket I put together using Betty Bunny so I will post all the step by steps any problems just leave a comment  and I will get back to you.


Easter Picnic basket with matching card using Betty Bunny


Box base card stock measures  10"15/16 x 7"15/16 of an inch score at 2" on all 4 sides 


Now cut up to the centre line at 2" and cut a small piece of card stock out forming a tab to glue the box together

Box lid


Box lid measures 11"x 8", on the short side score at 7/8 inch & 2" & 5" & 6" turn the card on your score board long ways score at 7/8 inch & 2" turn again score at 7/8 inch  & 2" & turn again score at 7/8 inch & 2" now burnish all your score lines then cut off 3 sections each side as shown in the photo and cut on a slant to form your glue tabs. As you can see in the photo 3 tabs have to be cut off on each corner
Box lid where the black marks are on each corner cut off just to help you as a guide


Now place wet glue onto your tabs or strong red liner tape this is your base


This is the lid the 2 thin flaps in the centre fold back and glue together now add your glue to the small tabs and hold in place for a few seconds until glue has grabbed the card stock.


Now place glue on the side tabs this leaves a really neat finish to the lid

The only thing that should be free are the tabs in the middle at each side

Now place the lid onto the base making sure the tabs in the middle are tucked inside the box roughly mark where you want to attach the handle and mark with a pencil then with a hole punch punch this out now put the lid on as before and with a pencil go through the hole and mark the tab so it all lines up then punch a hole in the tab and repeat on the other side

Like this

This is the handle 1"x11"


Now punch a hole in your handle and thread a Brad through the handle through the lid to the base and secure by bending back the pins on the back of your Brad do the same on the other side take your time doing this as it's a little fiddly

Now the box is ready to decorate any way you wish

The sides lift up each side so you can place a lovely gift or as I have done put some easter sweets inside

Decorated in :-
Woodland Buildables- Betty Bunny
Rococo golf set for the grass
Delicate Daisy from the Entwined Trellis
Flourish from the beautiful blooms and a pretty pink bow with yellow Nuvo drops added to the centre of the daisy


I hope you enjoy making one of these Picnic Easter Baskets and can follow my instructions any problems please leave a comment and I will get back to you when I can.

Thank you very much for taking a look at my blog today be sure to pop back soon as I have many more samples to share with you from this adoreable  collection.


Until next time 


Alluring Perfume Bottle gift boxes